Custom Flame Painting Suggestions!
If you are familiar with custom flame painting then you also know how much attention a killer set of flames can attract.
Especially on your custom chopper, motorcycle, car or truck. Flames look awesome on other things too!
Like a custom made barbecue, motorcycle helmets, welding helmets, the list goes on.
If you want flames on your ride, you have a few choices to make.
Doing it yourself or having a company do it. Both options are valid and have their own advantages. If you do it yourself there are a few things about custom flames you will need to know.
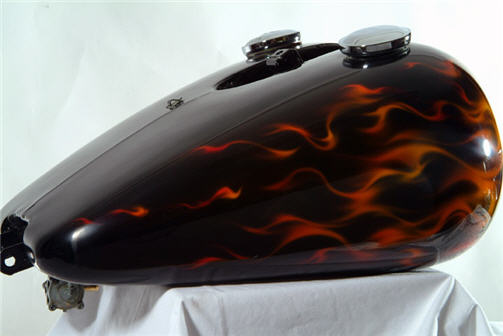
Pictures below are courtesy of Pamela Shanteau, one of the best airbrushers in the world.
For starters you need to make sure that all the chrome is removed wherever you plan to paint the flames. Anything standing in the way of your paint has to be sanded off. Otherwise it will have an obvious effect on your custom flame job. There are many steps involved in airbrushing flames, particularly before the paint is applied. The first step is sanding. You need to prepare the part of your chopper to be painted. Most often you will use a piece of wet sand paper, some water and a small amount of dish soap.
Make sure your tank, or whatever you are painting is securely fastened on during the sanding.
After you have sanded off anything in the way of your paint and made the area nice and smooth, it's time to start the second step of your custom flame paint job, spraying the base coat. You need to decide what color your base coat will be, and apply it to the part, before actually creating the flames. It is recommended by many custom flame painting experts to coat the part in the base color in a couple of different layers. This ensures that every inch is covered with the base paint. Don’t forget to spray on a wax, silicone and grease remover. This will make sure that there are no hand or fingerprints.
An additional clear coat ensures that if you have to sand any of your flames off, the base coat will not be removed as well.
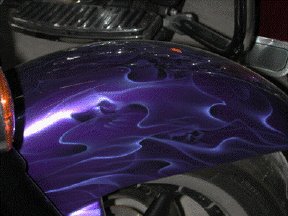
The next step is the actual flame painting. First outline the flames with various shades of paint. Be creative. You can have traditional orange and yellow flames, or you could have blue or purple flames.
Once you have painted on the first layer of flames apply a few more coats so your paint job does not fade. An additional clear coat can help to ensure that the colors remain vibrant.
The final step of a custom flame paint job is buffing. It is recommended that professional buffers are used when you are buffing the area where the custom flames are. Make sure to buff the part to a shine. It makes your custom flame painting stand out. All of these steps are crucial to make sure that your custom flame paint job turns out exactly as it should. You must make sure you follow these steps precisely. Otherwise your paint job may turn out to be something totally different then what you had imagined.
Custom flame painting is done by many body shops in a variety of styles and colors as well as for a variety of prices. If you have the money, flames can add something to your chopper, a certain flare it may have lacked before.
If you plan to airbrush your chopper it is suggested that you research the types of paint, the dealers reputation, and learn the ins and outs of what you want in custom flame job and how to get it done as a precautionary measure.
This ensures that you end up getting the custom flames that are just what you were looking for on your custom chopper.
We recommend Pamela Shanteau. See product recommendation below....
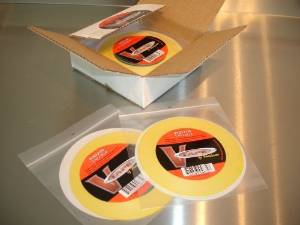
Product Recommendation:
Paint Any Motorcycle, Car, Truck -- Any Project -- Like A Pro!
By the way, our special mini course contains custom chopper suggestions, reviews, special deals, and more. Try it. It's free!
Flame Painting Tips and Techniques!
Painting flames is a very common technique to increase the awesome factor of your bike, and they are not difficult to do if you follow a few simple techniques.
If you are not sure where to begin, first look at other paint jobs and see what you like or what inspires you.
Then, go with the idea you like most. Keep in mind that the size of your flames in relation to your chopper is fairly important. You don't want them to be too large or too small. Also, you can use different colors of flames other than the tradition red, orange and yellow coloring. Purple is really cool and not very common.
For a good resource on choosing and understanding colors and contrasting colors you should get a color theory guide. There's a lot of them out there.
Using a brush to paint flames is for advanced painters and is not the way to go if you are an amateur. What you should do is use an airbrush to paint flames. It's much easier, it looks really good, and you can fix mistakes much easier, especially since you will be using tape to help guide your work.
After you choose your custom flame painting design, what you want to do is put your idea on paper. Make sure your design on paper fits the part you will be airbrushing.
An easier and common technique that even the professionals use is a stencil. After working on paper for practice get some metal like maybe some aluminum flashing and practice on that. But be sure to use your pinstriping tape to practice that as well. Then use this opportunity to try different techniques and effects.
You will want to use fine line tape (1/16, 1/8, etc) to lay out the edges of the flames.
After you practice on metal and you feel confident with your work, you can now start working on your bike.
First use the pinstriping tape to create the flame designs on the parts you will be painting. Then, use regular paper (not newspaper) to mask off any parts you don't want overspay on, because there will be overspray.
After you finish pinstriping and masking off the parts, you can lay down your first coat of paint which is your base. This will be the main color of your flame so get this right.
If you want fades or shadows on your flames you'll begin that on your next coat.
If you want ghost flames, what you want to do is add pearl paint to your clear paint and mix it up. Mix up a big batch because if you need more later on it will be hard to get the right mixture to match what you have done.
You'll want to shake and or stir this mixture frequently. Once technique you can use for painting ghost flames is to airbrush a few different layers at a time. Practice it first.
Edging:
To achieve a good smooth outline for your flames you'll want to use the edge of your pinstriping tape. This is called 'edging'. This is where you begin at the very tip of your flame and the airbrush your way down to the bottom of your flame design.
You can use any color you want when edging but some professionals like to use one of colors that are in your design or base paint.
Effects
After the paint dries, take off the pinstriping tape and begin making your effects: fading, shadows, etc.
If you use a fade, what you want to do is begin at the biggest part of the flame design and then airbrush your way up to the flame tip.
Once you finish your effect it's time to sand paper (extremely fine, like 2000), and sand it for a smoother effect. If any of the airbrushed edges need to be smoothed out use the wet sanding technique with 2000 grit sandpaper.
The reason for wet sanding is to use this technique to get a better effect to your flame painting. It creates a more deep effect.
