Customizing A Royal Enfield 500!
by Mohit Chawda
(Hyderabad, Telangana India)


|


|

|


|
Hello there. It has been a wonderful experience working on this Royal Enfield 500 build. There were challenges as well as moments of joy on overcoming them.
1. We started with striping the front end, new aluminum triple tree was milled so as to accomodate the 110mm front tire.
2. The remaining body parts were disassembled for getting the real time sizes and dimension for the parts to be fabricated.
3. Meanwhile procurement of custom accessories and the rear 190 mm tire was done.
4. Started the fabrication of the tank from the sheet metal.
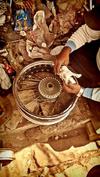
5. Then we started making the rear Rim to accommodate the Michelin 190mm wide tire, (after one failed attempt we got the rear wheel perfect).
6. The rear hub was also altered as per the calculation of the rim.
7. The rim, hub, and spokes were laced. The lacing done to the rear rim is no ordinary job, it has a 60 spoke pattern.
8. The tire was then mounted on the wheel and next was to extend the swing arm for it.
9. Keeping the strength and the quality in mind instead of making it a 3 joint swing arm which is normally done, we made it with 2 joints, (2 swing arms were chopped in the process).
10. The tire with the swing arm were installed at the pivot point and now get the rolling chassis which completes the 2nd
11. Now that both the tires are at its place we make the patters for the rear and the front fender to be fabricated.
12. The main chain drive is extended adding few more links to the existing chain to complete the drive train.
13. Once the fabrication of the fenders is done appropriate size of side plates is made in Mild Steel. Also the Bushes and spacers were milled in lathe machine for making the fittings and the mounts.
14. The side plate are welded to the chassis which then provides the mounts for the rear shock absorbers at the angle that provides best flexibility.
15. The Bushes and mounts for the fuel tank and fenders were then welded to keep them in their accurate position.
16. When the fabricated parts are mounted on their actual fittings the bike begins to take its shape.
17. Apart from what is said countless miscellaneous work was performed to get the current state of the bike.
While the project is still in process here is the remaining part of the journey.
Final Royal Enfield Customization Stages:
1. Fabrication of the side covers(already in process).
2. Purchasing and mounting the rear disk brake kit.
3. Handel bar and forward foot controls.
4. Seat plate.
5. Test ride.
6. Disassemble and getting the Paint job.
7. Detailing and Airbrush art.
8. Final test ride and photo shoot.
9. Delivery.
Comments for Customizing A Royal Enfield 500!
|
||
|
||
|
||
|
Click here to add your own comments Join in and write your own page! It's easy to do. How? Simply click here to return to Your Bike. |
