Install Electrical Components:
The electrical system on a motorcycle seems to make a lot of people nervous. What we're going to do right now is install all of our electric components, make sure they fit correctly, and be cognizant of where the wiring is going to go and meet for its final location. We're going to dive a little bit more into the electrical system during assembly as far as how it works in theory.
I've decided to go ahead and put in some turn signals on our project. I got a little bit of static from friends thinking it was dumb for putting turn signals on my custom little bobber here, but I personally don't like getting into accidents.
I figure any information I can give to people on the road next to me, the better. Do they look super clean? Not really but they're not that bad, so it's something I'm willing to live with. For these turn signals, I'm also going to run the wiring right into the frame.
Install Electrical Lights:
If you're in a spot you really can't get a drill bit into, go ahead and mark it just with sharpie. After disassembly, you can go ahead and hit those marks, and drill them out.
Then double check the wiring to make sure it fits in freely. Next up, we'll sit in our brake light and running light. This isn't going to be the exact location because there's going to be a cover that goes on over this, but this puts me in the right department at least.
I'll kind of decipher where I want to run this wiring. It's probably going to be right behind this mount down and into the frame. I'll lightly sit that down here. Probably something like that.

Custom Breaker Box:
Then we'll have a little plate I cut out. This is going to be for our breakers. This guy is almost like a breaker box. I'm going to put it underneath the transmission, mounted to a cross member on the frame. I'm also going to drill some holes into it, put our breaker mount holders into it so the breakers can be fitted in. Just like this: right down in a line.

Install Electrical Signal and Ignition Key:
And our turn signal flasher will also fit right in to
one of these, so I'm going to run all these down here. Any other
electrical components you feel like you should have or you're going to
need for your system, you can mount on something like this. Just tuck it
away in a hidden location.
Then I've got a couple other items I
still haven't 100% decided where I'm going to put them. I've got an
ignition switch key, which I'm probably going to sit up and weld onto
the frame somewhere by the oil tank. And a speedometer. Typically you'll
see them on the handlebar.
I think I'm going to get a little bit creative because I like having the clean look of the handlebar without having something big and bulbous looking at me. I might just put it on the side of the frame. It's just another something to be mindful of when you're going for wire routing.
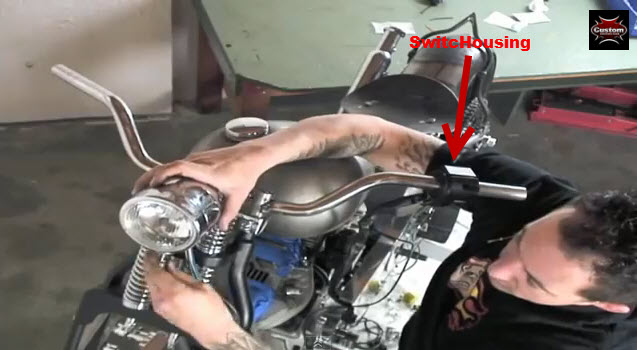
I'm going to loosely install my switch
housing hardware right there. Then I'm going to take our headlight,
mount it up.
Handlebars and Headlight Electrical:
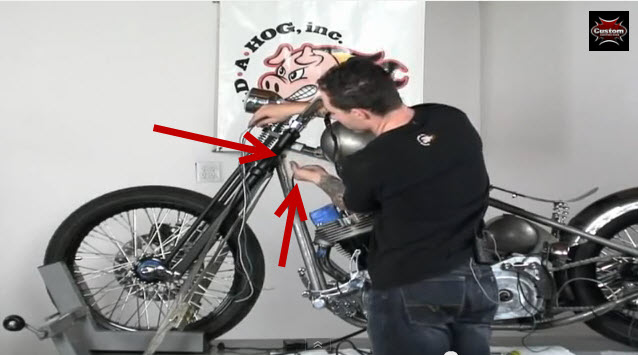
And to install electrical on the handlebars and the headlight, my plan is to take all the wiring from the two and run them through this hole that I drilled out in the frame. And then in turn, drill a hole in either one of the down legs or the top tube to run the wiring through, back to the battery.
Voltage Regulator:
And the battery is located on this bike in the oil tank. There's a little divot out for it. It's going to be our final mounting location. So I've got those in place.
Lastly, I've got my voltage regulator, and I'm going to mount that right on the frame in front of the engine, and then route the wiring from there.

Why Mockup Is Important:
Our last stage is going to be taking the bike off of the rack and permanently welding in our kickstand assembly.
The reason I want to take it off the rack to make sure that our lean angle is correct, make sure it sits correctly while it's on the ground and on the kickstand. And that will complete our mockup stage.
I can't stress how important the mockup stage is because it allows you to make sure all the parts on the motorcycle work together, and it really allows you to use your creativity.
The more thorough you are in your mockup stage, the less problems you're going to have on your final assembly. So from here, what I'm going to do is tear this bike down completely, send everything out for chroming, painting, powder coating, whatever we need to have done.
Copyright WcWelding.com All Rights Reserved.
