Chopper Frames Tutorial:

Rigid chopper frames least challenging type of motorcycle frame to build, (and maybe the most fun) because you don't have to worry about fabricating a swing arm for a softail. So building a rigid frame for a first time project might be a good idea. For an explanation of the difference between hardtail and softail frames read this.
Before you start building you should be knowledgeable of the different parts of a rigid and softail frame. We will mostly be discussing the parts of a rigid or hardtail frame...
Chopper Frame Basics!
A typical chopper chassis, whether it's a softail or a hardtail, are made up of several parts of DOM or ERW tubing (not pipe!):

- Wishbone: The wishbone tubing is found on the top of the frame and on the rear end of the frame. The wishbone consists of two pieces of tubing which are bent in such a way as to make room for the chopper or bobber saddle (bobber style frames are basically the same thing as a chopper frame. Read more about bobbers here).
The wishbone tubes are welded to one another. They are also welded to the backbone (also known as the top tube) and the bottom rails of the rigid chopper frame. If you are building a softail frame the tubing is welded to the side plates.
The reason these pieces of welded together tubing are called the wishbone is because they look line one, once the welding of the frame is complete, or at least that part of it (you'll see in a moment). - The next part of the a chopper frames construction is called the Backbone (a.k.a. The Top Tube). This area of the frame is welded to both the wishbone frame tubing and the neck stem.
- Next we have the Bottom Rails. The Bottom Rails are fused to the neck stem and the rear part of the wishbone tubing. But, if you are building softail chopper frames then you will weld them to the side plates.
- The Downtubes consists of the area which lies between the neck stem and where it bends.
- In addition we have the Seat Post. The Seat Post is simply tubing which is welded in place between the backbone and the crossbrace which is between both of the bottom rails of the chopper frame (you can see an image of that below).
The reason it there is because it helps the frame achieve better rigidity. Many designers don't include one, but they make up for rigidity in other areas of the frame.
Here Is The Chopper Frame As Described Above (Note the shape of the wishbone. Also note that you can see where a builder will install the front end):

- The neck of the frame consists of 3 different sections:
- Neck Stem: the neck stem is forks and the chassis connect. The neck stem is not a tube. It's a piece of steel that has been specially machine to include ball bearings in order to fit the chopper or bobbers front-end (forks and steering). It is a very important part of the chopper chassis, and it requires a little more support.
- Many frames also have what is called a Neck Gusset Tube: this is a piece of tubing that is attached with the top tube and the bottom rails.
- The Neck Gusset fuses it all together: It provides more support for the front end and the Neck Stem.
A Neck gusset is an important piece of metal that is welded to the neck gusset tubing, stem, backbone, and also the bottom rails of the frame. It improves the rigidity and provides support.
But many frames don't have a neck gusset. But support needs to come from somewhere so, for example, the builder might put 'struts' between the downtube and the neck stem.
Neck Gusset Weld Example:

Mounts:
Up to this point we have covered the most basic parts of chopper frames and how they are constructed. But we are just getting started.
You need to be able to install an engine on the chassis and to do this we need to weld on some mounts for the engine, and also the transmission, gas tank, and the rear fat tire (you should use at least 200 series rear wheel. 240's are popular. 300 and 330 are also very cool).

The Top Engine Mount is attached to the backbone. There are three in the diagram above (see dotted line pointing to each motor mount bracket). The other two are on the lower downtube and the seat post or center post. These are called Engine Mounts, and are usually thick plates. The engine 'sits' on the plates.
The engine is always bolted to the engine mount plates ot all three mounts.
You will need to mount forward controls on your chopper frame. The adapters for the forward controls are situated close to the engine mount (forward).
You will attach your gas tank to where the clips are illustrated above which are located on the top side of the top tubes. The clips are simply there to let the tank rest upon on either end of the tank and are fabricated to do so.
What is usually used for mounting the gas tank is plate with holes drilled to accommodate the holes on the gas tank. You then fit the gas tank to the plate so that if you need to remove the gas tank you can do so simply by unbolting it from the mounted plate.
The Transmission mount is located as seen in the illustration. It's behind the seat post. It is also bolted on but the mount is welded on of course.
A Seat Clip is situated on the wishbone to accommodate the saddle of your choice. It is mounted in front of the seat post. This is not usually taken care of until later on in your build.
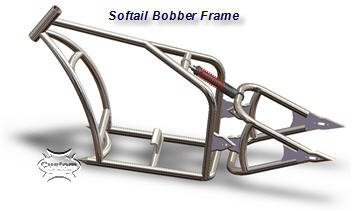
Softail Frames:
At this point you have learned all about how hardtail chopper frames are built. You can construct a softail using a swingarm. Also, you can buy weld on swing arms if you ever want to convert your rigid frame into a softail.
A swingarm houses the rear wheel and moves fairly independently of the rest of the frame in order to make the ride softer. It's the major component of your rear suspension.
A pivot axle is used to install a swing arm to a frame. In addition a system need to be installed to create that cushy feeling. The frame below has a shock absorber installed as an example:
Copyright WcWelding.com All Rights Reserved.
