Shovelhead Bobber Build Part 1

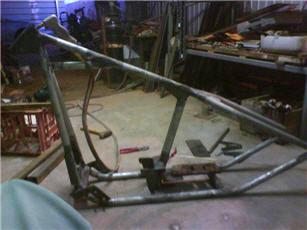
Just an update of my rigid shovelhead bobber build project (its been a while). I'm using the Henrob DCH 2000 to do the welds they are truly the way to go for this type of project, no spatter or clean up and tig strength. this is only 250 mpa tube so its a mock up,a prototype if you like.
I've put extra gusset in there and have not welded the ends of the gussets. This is a 46 deg rake and the bike is purpose built as a bar hopper and there are no corners up here near me for 200 mile even then there not tight.
I have 3 other scoots for other type's of riding.
Rigid Shovelhead Bobber Build Part 1
Now this motorcycle build is a passion for me a labor of love otherwise I would be smarter to buy one off the shelf pre fabbed. They are cheap for the individual effort put in. At first I thought they were rip off's but this is not true.
There is a lot of time and potentially cost through making your jig and from mistakes and bends. I have winged most of this bobber build project and have a long way to go.
At least I'll never have so much trouble with the measuring tape on the next one. Measuring clearances is the hardest if you don't follow the plans exact.
And yep, I to wanted to be different on this bobber build. So out with the tape, and measure 5 things to get one measurement right. I'm doing it for the experience that is all and to sit on a bike I can say I built from ground up. Not to show. It will be matt black.
Rigid Shovelhead Bobber Build Part 2.
42 deg rake. Yes, it's only a bar hopper and that's all its intended for...a few highway miles. I live in the out back Australia and there isn't a bend here for 200 miles.
Note the rear engine mounts on my shovelhead bobber frame are brought forward of the chassis seat post mount to be able to be cut out and a different motor put in there is an extra 2" stretch in the rear end to for the gearbox area to be changed if ever i wish.
And the top of the shovelhead bobber chassis is 1" higher than stock at the seat post for the rocker box and head removal. If ever needed as a rider of an original shovel I decided these changes would make it a user friendly machine for one that does their own work and road side quick fixes. I am a tall bloke but I made some foot peg mounts to come back a bit for comfort and I can buy forward controls that go out further if I feel like.
All gussets on this shovelhead bobber build have been thought out for mounting other hardware. Gussets are interesting as I learn. They have to look good, give you access to nuts and bolts, and be clear of hoses, and be made strong for there use, and can also serve to mount other hardware. Gussets as i understand should not be welded on the ends to prevent a to rigid area prone then to possibly crack. Only weld up the sides.
Remember if you don't have good resources, buy a chassis. They are cheap for the effort required to build it. It would have been cheaper for me to buy one if I wasn't doing it for the experience and making more than 1 for myself, and didn't have good access to resources. I also had a lot of tools already before I started which helped and consumables like grinding, cutting disks, and tig rods, as well as the welder and measuring tools.
Related Articles:
Recommended DVD:
